Wednesday, 21 June 2017

Home Automation using Cloud - IBM Bluemix Watson


Block Diagram of the Project:


Flow of the Project with Detail Structure:

LabVIEW Screenshot depicting the control of the Applications in Home:

Cloud Dashboard for Collecting Different Sensor Data:

I2C - INTER INTEGRATED CIRCUITS  -- Serial Protocol
--> Communication Protocol
2 lines
SDL - Clock Line
SDA - Data line

MultiMaster Multi Slave Communication
Every Device is assigned with a unique address
For the Device which we are using it address is 0x48H
Temp | Humidity | Gas | Flame
Common to all Sensors is 4 pinout
1. VCC - 3.3V
2. A0 - Analog out - ADC
3. GND - 0V
4. D0 - Digital Op
              I2C
Raspberry PI <---> ADS1115  --- VCC, GND, A0, A1, A2, A3
    |     |      |     |   --->
    Temp  Humi  Gas   Flame
  
  
ADC - Analog to Digital Conversion16 bit ADC
Analog - voltages - sinusoidal signals
0-3.3V -- 0 --32767
2^16 - 0 to 65535 ( 65535/2 = +-32767)
  
y= 2.5V - Temp_Volt
x =  32767 * Y/3300
  
Value[0] =x
y= x*3300/32767


HOME Automation using Email - Raspberry PI Controlling 230V Household AC Circuits via command from Registered Mail id

HOME Automation using Email - Raspberry PI Controlling 230V Household AC Circuits via command from Registered Mail id

The Whole system is developed using Raspberry Pi for better performance and efficiency. Further, python coded algorithm has been fed into the raspberry Pi and is connected to the internet, with interface to access and send e-mails to the consumer via SMTP protocol and libraries. The Devices to be controlled have been interfaced with raspberry Pi using relay driver circuit due to different power ratings of devices and raspberry Pi.
Python Code Flow Chart:

Logic for Alert for Visitor:

 Email Command Processing:
Deleting Read Emails


Processing New Emails:


REMOTE ICSP Programming - In Circuit System Programming (ICSP) using Raspberry PI GPIO via Bitbanging Technique

REMOTE ICSP Programming - In Circuit System Programming (ICSP) using Raspberry PI GPIO via Bitbanging Technique

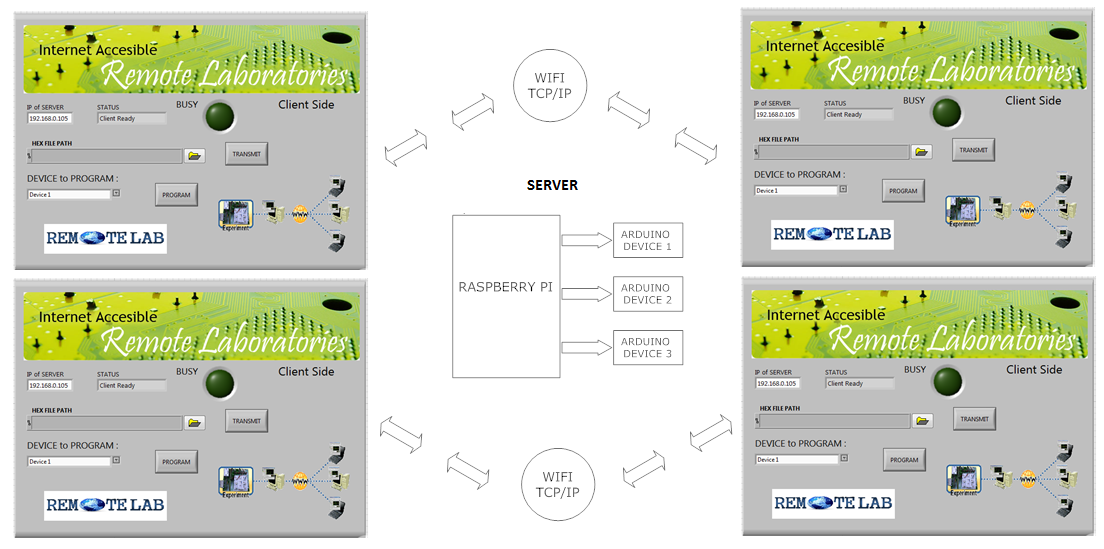
Working of the Project:
 Raspberry PI is configured as server which has the capability to program the Arduino using AVRDUDE installed on it. Raspberry PI is ported with raspbian jessie
OS based on Linux Kernel, Firmware of Raspberry PI controller is written in python. On the Client side a software application created using Labview which connects to the server and capable of
transfering hex file to the server and Communication commands for certain actions of the server through TCP/IP Protocol.

Features / Capability of the Server controlled via the Client:

Entire project is based on command driven approach.
1. Client can send Transmit command and server accepts the connection and gets ready to receive hex file, client transmits the hex file and once its succesfully
 done socket connection is closed
2. Client can send program command to the server and server Initiates the programming of Arduino using AVRDUDE which in turn uses concept of Bit Banging, converting
 GPIO lines of the raspberry PI in to SPI lines and programs the arduino using ICSP lines
3. Client application is Event based which connects to the server only when transmit button click event happens or program button click event happen.
4. Number of Devices can be connected to the Raspberry PI but limited by the number of GPIO lines available on the PI

Features of the Project

1. Client is able to connect to the server on port 8888 with server IP details and instructs the server to program the Arduino devices connected to it.
2. Multiple clients can be connected to the server and Multiple devices can be programmed accordingly
3. The communication is over the TCP/IP Protocol hence distance is not the limitation but for this project the server as well as the client has to be in the same network

Libraries used in the Project

1. AVRDUDE:
 [ For Complete Documentation : http://www.nongnu.org/avrdude/user-manual/avrdude.html ]

AVRDUDE - AVR Downloader Uploader - is a program for downloading and uploading the on-chip memories of Atmel’s AVR microcontrollers.
It can program the Flash and EEPROM, and where supported by the serial programming protocol, it can program fuse and lock bits.
AVRDUDE also supplies a direct instruction mode allowing one to issue any programming instruction to the AVR chip regardless of whether AVRDUDE implements
that specific feature of a particular chip.
AVRDUDE can be used effectively via the command line to read or write all chip memory types (eeprom, flash, fuse bits, lock bits, signature bytes) or via an
interactive (terminal) mode. Using AVRDUDE from the command line works well for programming the entire memory of the chip from the contents of a file,
while interactive mode is useful for exploring memory contents, modifying individual bytes of eeprom, programming fuse/lock bits, etc.
AVRDUDE supports the following basic programmer types: Atmel’s STK500, Atmel’s AVRISP and AVRISP mkII devices, Atmel’s STK600, Atmel’s JTAG ICE (both mkI and mkII,
the latter also in ISP mode), appnote avr910, appnote avr109 (including the AVR Butterfly), serial bit-bang adapters, and the PPI (parallel port interface).
PPI represents a class of simple programmers where the programming lines are directly connected to the PC parallel port. Several pin configurations exist for
several variations of the PPI programmers, and AVRDUDE can be be configured to work with them by either specifying the appropriate programmer on the command line
or by creating a new entry in its configuration file. All that’s usually required for a new entry is to tell AVRDUDE which pins to use for each programming function.
A number of equally simple bit-bang programming adapters that connect to a serial port are supported as well, among them the popular Ponyprog serial adapter,
and the DASA and DASA3 adapters that used to be supported by uisp(1). Note that these adapters are meant to be attached to a physical serial port.
Connecting to a serial port emulated on top of USB is likely to not work at all, or to work abysmally slow.

If you happen to have a Linux system with at least 4 hardware GPIOs available (like almost all embedded Linux boards) you can do without any additional
hardware - just connect them to the MOSI, MISO, RESET and SCK pins on the AVR and use the linuxgpio programmer type.
It bitbangs the lines using the Linux sysfs GPIO interface. Of course, care should be taken about voltage level compatibility. Also, although not strictrly
required, it is strongly advisable to protect the GPIO pins from overcurrent situations in some way.

The simplest would be to just put some resistors in
series or better yet use a 3-state buffer driver like the 74HC244. Have a look at http://kolev.info/avrdude-linuxgpio for a more detailed tutorial
about using this programmer type.

2. Socket Library in Python for TCP/IP communication
   [ For Documentation : https://docs.python.org/2/library/socket.html ]
   The Python interface is a straightforward transliteration of the Unix system call and library interface for sockets to Python’s object-oriented style:
   the socket() function returns a socket object whose methods implement the various socket system calls. Parameter types are somewhat higher-level than in
   the C interface: as with read() and write() operations on Python files, buffer allocation on receive operations is automatic, and buffer length is implicit
   on send operations.


Sunday, 15 May 2016

LIVE VIDEO TRANSMISSION between PI and PC

Live Video Streaming Remotely over Internet 

Block Diagram :


Working of the Project:

Raspberry PI is configured as Server which continuously transmits Video as Mpeg format through Deamon process at background with the help of Motion library, Standard USB Webcam is configured as /dev/video0 device to capture video and hence transmission is dont through TCP protocols with a IP & Port number, A .net application to receive the video through TCP Protocol and preview the live stream through ozeik SDK Library. By connecting to the IP & port number of the server ,Client Live Mpeg Viewer gets the live stream online.Usually in TCP/IP protocol all transmissions are done as strings, and for live video transmission images are taken continuously with 30 fps and transmitted through TCP/IP by conversion in to base64 string and received in Client side, and then they get decoded back to images through base64 
library and displayed as video.

Motion Library:

Motion is a program that monitors the video signal from one or more cameras and is able to detect if a significant part of the picture has changed;In other words, it can detect motion.
The program is written in C and is made for the Linux operating system, (using the video4linux interface). Motion is a command line based tool whose output can be either jpeg, ppm fies or mpeg video sequences. Motion is strictly command line driven and can run as a daemon with a rather small footprint and do

Motion, a software motion detector, is a free, open source CCTV software application developed for Linux.It can monitor video signal from one or more cameras and is able to detect if a significant part of the picture has changed saving away video when it detects 
that motion is occurring (it can also do time lapse videos, et al.).The program is written in C and is made for Linux (exploiting video4linux interface). Motion is a command line based tool whose output can be either jpeg, netpbm files or mpeg video sequences. It is strictly command line driven and can run as a daemon with a rather small footprint and low CPU usage.
It is operated mainly via config files, though the end video streams can be viewed from a web browser. It can also call to user configurable "triggers" when certain events occur.

Webcam Server

Motion has simple webcam server built in. The video stream is in mjpeg format.
Each thread can have its own webcam server. If you enable the webcam server (option webcam_port to a number different from 0) and you have more than one camera, 
you must make sure to include webcam_port in each thread config file and set webcam_port to different and unique port numbers or zero (disable). Otherwise each webcam server will use the setting from the motion.conf file and try to bind to the same port. 
If the webcam_port numbers are not different from each other Motion will disable the webcam feature.Note: The webcam server feature requires that the option ppm is set to off.
The webcam_maxrate and webcam_quality options are important to limit the load on your server and link. Don't set them too high unless you only use it on the localhost or on an internal LAN. The option webcam_quality is equivalent to the quality level for jpeg pictures.
The webcam_limit option prevents people from loading your Network connection by streaming for hours and hours.The options defines the number of picture frames sent as mjpeg Motion will allow without re-connecting (e.g. clicking refresh in the browser). The option webcam_localhost is a security feature. When enabled you can only access the webserver on the same machine as Motion is running on. If you want to present a live webcam on your web site this feature must be disabled. The webserver generates a stream in "multipart jpeg" format (mjpeg). You cannot watch the stream with most browsers. Only certain versions of Netscape works. Mozilla and Firefox brosers can view the mjpeg stream but you often have to refresh the page once to get the streaming going. Internet Explorer cannot show the mjpeg stream. For public viewing this is not very useful. There exists a java applet called Cambozola which enabled any Java capable browser to show the stream. To enable the feature to a broad audience you should use this applet or similar.

For More Information:
Please Feel free to put a request to gvjselva@gmail.com

EMBEDDED DEAMONS
www.vjece.blogspot.in


RF REMOTE MONITORING SYSTEM using Arduino & LabView

Remote Environment Monitoring System:

Project aims @ Collecting the Environment Parameters such as Temperature, Humidity, Presence of Flame and Presence of LPG gas. Arduino controller collects data from Different Sensor and Process it to capture the environment conditions and transmits the same data to the PC running an app created using LabView which collects the data and displays it through its GUI and collects data Periodically and plots graph and gives Report. Communication between Arduino and PC is done via Wireless RF module operating in 2.4Ghz frequency and adopts on of the serial protocol.

Project Implementation:

Arduino Based Environment Monitoring using RF Transceiver Module


LabView based GUI Implementing VISA Serial Communication:


For more Information please feel free to contact VIJAY SELVA.G | 07738417396 |gvjselva@gmail,com


VOTING MACHINE - Secured by Finger Print Sensor and Photo Capture using Camera

Secured Voting Machine using Raspberry PI 

Description:

Project aims @ Implementing Voting Machine which has ability to verify the Finger Print of the Voter and allow him for the Voting Process and at the same time captures the Image of the Voter and Gives Count of number of Votes during Election and Final Results @ the end.

3 Modes of Operation
1. Initialization;
In this Mode Finger Prints are Stored , it can be stored via a database or adding Manually
2. Run :
Normal Voting Process in which Voter's Finger Print is examined and allowed for Voting Process accordingly, an Image of the Voter is stored and if any illegal voter is Identified image of the voter will be mailed to the Election Board Mail ID registered.
3. Result:
Displays the Winner of the Election with detailed Individual report out in LCD as well as in Interface

Project Implementation:


For More Details:
Please feel free to put up a request to gvjselva@gmail.com

EMBEDDED DEAMONS
www.vjece.blogspot.in


HEALTH MONITORING SYSTEM using Raspberry PI & LabView

Heart Rate and Blood Pressure Monitoring using IOT:

A Device capable of sending patients Heart Rate and Blood Pressure readings wirelessly over WIFI through TCP/IP Protocol to the Server established in main room and able to give a detailed report of Periodic Analysis of Different Patients in Different Room. By regular Monitoring the Patient health conditions are monitored remotely with a detailed report out.

Project Implementation Block Diagram:


Tools Used:

Raspberry PI Firmware Using Python
Labview for GUI and Report Generation

Project Implementation:


LabView GUI Interface:


Python Firmware Flow Charts:

Main Loop:


Serial RS232 Interface


Blood Pressure Values Reference:


Underground Cable Fault Detection Using Raspberry PI

Under Ground Cable Fault Detection:


The aim of this project is to determine the distance of underground cable fault from base station in kilometers. This project uses the simple concept of ohm’s law.When any fault like short circuit occurs, voltage drop will vary depending on the length of fault in cable,since the current varies. A set of resistors are therefore used to represent the cable and a dc voltage is fed at one end and the fault is detected by detecting the change in voltage using a analog to voltage converter and a microcontroller is used to make the necessary calculations

Project Block Diagram:


Tools Used:

Raspberry PI Controller Firmware is written using Python 
PC Side Fault Indicator Application is Developed using NI LabView
Hardware is designed to suit the application by detecting short circuit

Reference Documents:


IOT Concept:

PI Detects the Faults via a Circuitry, Process it and finds the distance of the Fault in KM. Update the Server via TCP/IP Protocol, Firmware Implementation is done Using Python and it communicates to the server with IP and port number. Server side Code is Implemented using LabView which is a Graphical Programming Test and Measurement Tool which Indicates the Fault Location using GUI.
This Project requires active Internet connection or atleast the Network where PI and PC running Labview Application are connected.

LabView Code Sample:


Python Code Flow Charts:
TCP/IP Protocol :


USB DEVICE DRIVER INTRODUCTION

DEVICE DRIVERS INTRODUCTION

Thursday, 26 March 2015

Micro-Controllers in FPGA

Any  Digital Circuitry can be implemented using FPGA at lower cost because of High Integration of different required modules in to a single chip with low power requirement, low latency, high speed and customizable under future change of requirement.

FPGA Embedded Processors -----SOFT CORE MICROPROCESSORS

With Any Microcontroller in Market Designed by third party, there are high possibility of chances that they don’t fulfill our design requirement and modify our design to suite that Microcontroller, We may require one additional UART or there can also be unwanted circuitry which we don’t use inside controller always consuming power unnecessarily, With FPGA, we have our desired Microprocessor Architecture and we customize  it according to our need at the hour, depending upon the requirement we can add extra modules or remove , modify existing modules. Programming the designed Microcontroller is made easy with available tools from vendors in the market using which we easily can program our product and bring it to the market earlier.

PROGRAMMABLE SYSTEM ON CHIP- PSOC
Greater Versatility with high benefits to reduce Manufacturing cost and time to Market after design phase completion

Current works which shows high trending future and highly promising design methodology:
Xilinx and Maxim Integrated jointly provide Analog Solutions, some of the soft processors developed by Xilinx include
·        PicoBlaze- 8 bit RISC Microcontroller
·        MicroBlaze- 16 bit RISC Microcontroller   


Altera also have Soft Microprocessors – Bemicro board FPGA have Nios II Microprocessor inside and supported with FPGA Customization, using Quartus II Software, we customize our FPGA as a Embedded board with complete design of our requirement and using Embedded Design suite we program them according to the need.

Thursday, 26 February 2015

PG Diploma Project : Customized USB Device Driver for Interfacing BlueBoard


ILLUSTRATION OF THE PROJECT BLUEBOARD LPC2148 ARM7 ARCHITECTURE

Description:
                     Customization of USB Device driver for Firmware already available, to suit interfacing of Blue Board (LPC2148) having ARM Architecture for Logging Analog to Digital Converter Values. Analog to Digital Converter can be connected with any real time Sensors like Temperature sensor, Motion sensor, etc, and whose results are further used for analysis.
Link for Files
VS_USB_DRIVER


Sunday, 31 August 2014

How to post Empty Comment in Facebook :

Its Pretty Simple..Guys....
just turn on your Numeric Pad.....
just press Alt and type 0173 in numeric pad
and press enter....Enjoy..Commenting (Y)

Sunday, 22 June 2014

INVISIBLE POWER SOURCE

My Final Year Project - INVISIBLE POWER SOURCE, Microwave Energy Harvesting from Ambient RF 

PROJECT IMPLEMENTATION


PROJECT FILES:
1.Presentation Slides - Invisible Power Source
2.Project Report - Thesis
3.Base Papers - IEEE Base Papers

ACHIEVEMENTS:
We have presented this project in Electrofocus'14 conducted by ECE Dept. of Madras Institute of Technology, Chrompet and we won First Prize 

During our Presentation :

Thanks to ECE Dept., MIT for Encouraging us :


Thursday, 9 January 2014

Desktop Customization

Hi Guys, want to have a customized desktop to manage all your accounts and links in single click, here i found a cool stuff, RAINMETER using this you can customize your desktop using already created templates released by others or you also can make changes to the code and create new ones, Have a attracting and time saving desktop.you can download the install setup of the software from the above link or try pasting this http://rainmeter.net/cms/.
Short introduction about Rainmeter---

Rainmeter displays customizable skins, like memory and battery power, RSS feeds and weather forecasts, right on your desktop. Many skins are even functional: they can record your notes and to-do lists, launch your favorite applications, and control your media player - all in a clean, unobtrusive interface that you can rearrange and customize to your liking. Rainmeter is at once an application and a toolkit. You are only limited by your imagination and creativity.

Tuesday, 31 December 2013

Make your PC as Wifi-Hotspot

Have you ever thought to use your Laptop as a Wifi-Hotspot. Yes its possible with CONNECTIFY-ME. What we need really is Laptop or PC with Ethernet LAN connection and Wifi Dongle along with Connectify software, lite version is enough, Pro version is also available. You can dowload it by googling. So it helps me get Wifi hotspot in my home ,can be for you too..just give a try its Awesome i Connect my Smart phone to Internet using it. Try this link to Download

My Project for NIYANTRA 2013

I Participated in NIYANTRA 2013, Conducted by NATIONAL INSTRUMENTS every year, I thank my seniors for letting me know about it. I did some work upon Automation of Cars like Driver-less cars got some Inspiration from Google Driver-less cars and movies. I searched many techniques and found these appropriate Visual Odomentry which estimates the Ego Motion of an object, by incorporating this with GPS this gives information about environment where the vehicle is. Car's motion can be controlled by means of Micro-controllers. But i couldn't complete it fully Here is the Video link MACHINE VISION. But after some days i found same concepts were implemented by CMU. AUTOMATED CAR , its named as CMU's SRX.